Pages

Showing posts with label tips. Show all posts
Wednesday, June 22, 2011

Question Answered

Eddie,

I wanted to go take look at this area (Tennoiwa)since it is so close. Is it pretty easy to find? I have biked in that area, so I know how to get there. Is the climbing area easy to find? I would really appreciate any info you could give me, I would love to find a close place to climb.

Thanks,

Rob Poole


Rob,


Yes I think it is very easy to find. You are a member of MP so I am assuming that you have gone to my Japan page there. I added a Tennoiwa section there with an easy to follow description. There are many places to climb near by instead of Tenno. Tenno area is generally used guided trips. What I mean by this is that there are usually a boat load of folks that are there. The other reason I would steer clear is due to the parking situation. The fishing club down the street owns the parking areas near by. If you do choose to climb there I would recommend parking at the farthest parking area to minimize climber-fishing club conflict. Many Japanese climbers choose not to climb here because of this issue. Like I said though, there are many places to climb close to Yokota base, id est within 30 to 40 mins. I am always going to many of these areas, so let me know if you need more information than this. I am writing the only English guide right now to a few of these areas. I can let you know when I have it finished. Until then let me know of anything else you want to know and see you at the crag!!


Thanks,

Eddie

This is a photo of one section of the lower wall. I have more information up on the Japan Mountain Project page.

Tuesday, June 21, 2011

Stone Brewery's Ruination IPA


Stone Brewery's Ruination IPA, what a beer! This beer measures in at 7.7% ABV and more than 100 IBU's. The Ruination has a very interesting taste and color. Unlike most IPA's that I have enjoyed in the past, this IPA has a very hefei feel to it from start to finish. The color is very golden, with no visible sediment. This is not abnormal for an IPA, but what followed was very different to me.

The smell is very aromatic, with a floral and hint of citrus added to it. I felt like one of Pavlov's dogs right away. Once this beer hits your palette your mouth screams satisfaction!!! The powerful hoppy punch to the smooth, surprisingly tasty citrus finish is delectable. I had this beer with a nice, light summer meal and the IPA fit in very nicely. This beer is said to be very overwhelming to your palette. I do not disagree with this, but I do like it. It did change the taste of my dinner but in an unusual way. I was more attentive to the flavors of my BBQ'ed veggies and burger. I was expecting a total ruination but received a total reevaluation instead.

I think this is a great year round brew, but I will prefer to drink this one on warm summer days and nights due to the Ruination's refreshing overall experience. This IPA is one of my Favorites and goes to the top of the list. I give this IPA a 1 on the EGS.


Go Drink an IPA!!!!
Saturday, June 11, 2011

Nankasi IPA's


Over a couple of nights last week I polished off the fantastic Ninkasi DIPA and IPA.

The Total Domination IPA is my favorite of the two, it has more of a traditional northwestern IPA taste, which is my style. It being called TD I was not sure if it was going to be a total let down, but Ninkasi came through. At 6.7% ABV and 65 IBU's the TD has a nice floral start with a smooth hoppy finish. The TD combines three taste hops Summit, Amarillo and Crystal with a pair of malts that don't distract from the aromatic hoppiness. I have had this beer with both a spicy coconut curry and a burger and I give this one a 2 on the EGS.

The Tricerahops Double IPA is a more full, robust IPA. Not in terms of hoppiness but more of a stout or heavier bodied DIPA. This seems to be attributable to its three different malts. This beer has an ABV of 8.8% and 100 IBU's. On their website Ninkasi says this beer is earthy, I will totally agree with this and then some. This is a heavier DIPA than I'm accustomed to. I give it a 3 on the EGS. My buddy who favors Belgian beers loved this one and says he will drink it again should he find another.


In my time drinking IPAs I generally categorize them as 1,2, or 3 on the EGS (Eddie Gianelloni Scale). This is in terms of their repurchase-ability. 1 meaning that I go straight in and look to buy at least one on my next trip to the store. 2 meaning that I will forgo it on the next trip unless there are no number 1's and no new IPAs to sample in stock. 3 is left for the IPAs that I have sampled and will leave for someone else to enjoy.


Go Drink an IPA!!!!
Thursday, June 9, 2011

Question Answered

From time to time I receive emails for people asking for beta due to it's scarce nature in English. I have decided that I will post some of them here, maybe one will answer your question too. Hope this helps.

Hi Eddie,
How are you doing? Sorry this message is a bit out of the blue but I stumbled across your blogspot (very good by the way!) and thought I'd try to tap you up for a bit of info if you don't mind.
I'm currently in Japan with my fiance, we're based in Ashigakubo in Chichibu and also at Tokorozawa with her parents and were hoping to get some bouldering in while we're here.
Scouring the Net has brought up Mitake & Ogawayama as decent locations but could you recommend any others? Do you know of any in the Chichibu area at all?
We're looking for stuff up to about v5 really (not sure on grades to be honest so that might be an overestimate!)

Any info you could provide would be massively appreciated.

Anyway, hope all is well with you & yours.
Keep on keeping on,

Rich


Hello Rich

First, are you driving or using the trains? If you are driving there are MANY areas with in a couple of hours. If you are using the trains then it will take about three hours and a bit of walking to visit some of those areas. There are several published and non published areas around you in Chichibu. If you are just bouldering, then you can spend several weeks at Mitsumine and have many projects. If you go to any Outdoor shop in Chichibu you can find the Japan 100 series guides books, there are four of them and they are blue. The areas that you are looking at will be in the number 2 guide. Do you have pads? If not let me know, I will see what I can arrange.

Mitake is the most popular bouldering area in Honshu. This is primarily due to it's close proximity to Tokyo. There are several nice, large boulders at Mitake. I am actually writing the first English guide book to this area right now.

Ogawayama is a MUCH better place to climb in my opinion. Several sweet boulders with tons of problems in your grade range. Speaking of grades in Japan. I think the grades in Japan are very stiff. First off the Japanese do not use the V-scale or French bouldering grades. The kyu or Sho Dan scale is used. Check out my Mountain Project page on Japan for more info on this.

My favorite place to boulder in Japan so far is the Mizugaki area. This area has MANY, MANY untapped sectors and hundreds of boulders to be cleaned and climbed. There are tons of highballs to make me salivate every time I see them.

I am not sure if you climb routes but Japan has copious wonderful areas VERY close to you most notably Futago. Again some of the areas are open to the public and some are not. This is mainly because they are still being bolted and cleaned. Let me know and I can tell you more about them if you are interested.

I hope this helps. How long are you here? Where are you from? Let me know if there is anything else I can do for you.

Eddie
Tuesday, May 31, 2011

Eco Grip Gel


As usual I made my way to Calafata in Tokyo to play with all of the new gear and to have lunch with Jack. Among the many new shoes, harnesses, carabiners, and clothes was the this gel. The new NST Eco Grip gel is awesome!!! I am not into the liquid chalk scene at all, except for DWS. Liquid chalk is all over in Japan. Jack brought me over to the shop's climbing wall and asked me to hold onto a sloper pinch and lift my feet. Of course it was a fixed test and I could not lift my feet for any measure of time. We then lathered our hands in a small amount of Eco Grip Gel and after waiting about 1.5 mins Jack said "Again". This time to my surprise I was able to not only hang from the hold for 10 secs with my strong hand but, I was able to hang for 8 secs with my weak hand. "SOLD!!!!" I said to him in a flash.

This new Eco Gel is alcohol free, non-toxic, and biodegradable. There is no dust and the gel lasts all problem long (this is dependent on how much you choose to lather on). NST is a French company that makes an assortment of outdoor goodies. I think the guys at NST got this one right. I put my stamp of approval all over this one. Off to go climbing.

Ciao!


Go Climb Something!!!!
Monday, May 30, 2011

Organic Stick Clip


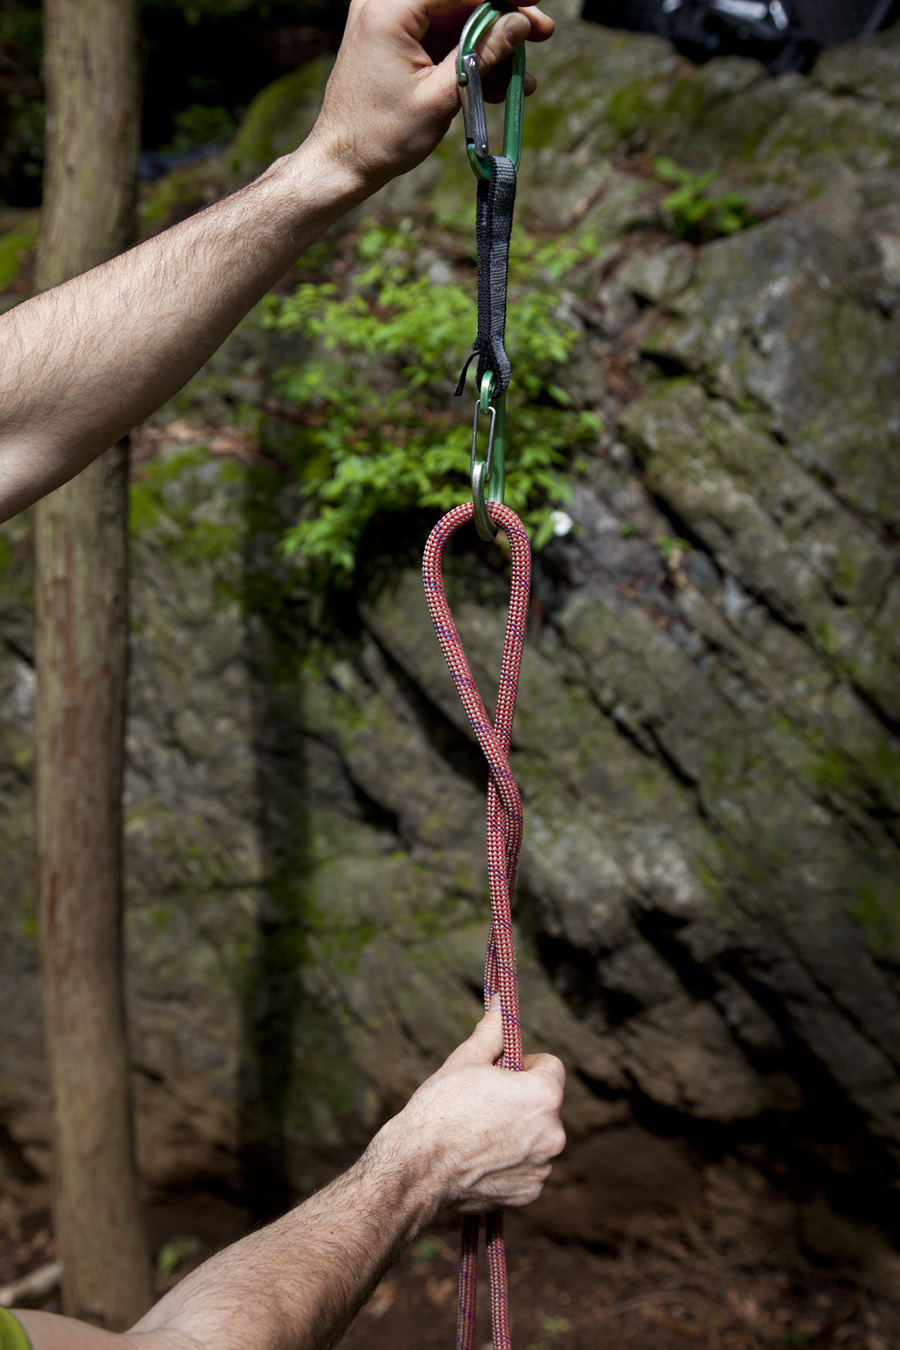
A simple ,easy, no frills way to stick clip on the fly. This is for clipping a rope into the first draw or as some like to call it, wienie clipping, without using anything extra. Not tape required.

First take two bites of rope. Make sure to leave your self enough tail on the side that you will tie into once the rope is clipped correctly into the draw.
Make an overhand knot with the two bites. Pull the knot tight.
Next find a branch long enough to reach the draw. Cram the stick into the knot in between the two bites.
Locate and grab the "tie in" side of the rope. Hold this side and the stick in the same hand to prevent the bite from pulling through the knot. Making sure to keep your rope on the outside of the draw, put this bite around the draw and slowly pull the bite tight.
If done correctly the rope should easily clip right into the draw no problem. Just make sure your side of the rope is on the outside to prevent back clipping.

Happy clipping!!!
Monday, August 17, 2009

Great Stick Clip Design


I am about to go on a climbing trip to Alabama and Tennessee. One of the areas that I am going to is Little River Canyon. LRC is wonderful. The steep and overhanging routes are a must visit. But at LRC, like most hard sport areas, you need a stick clip. I have not had one for the last few trips to LRC and wish that I did. So the question is should I buy one or make one.
I found a few designs on the web that looked very adequate. Considering that in the past all I have used is a dead tree limb any design is a drastic improvement. Or is it? The designs from Trango and Superstick look to be the best, but I have not used either. The customer comments online seem very mixed. Some people like how simple they are but comment on how fragile they are. Epic Sports design seems OK but the fact that you have to use tent poles turns me off. If I was hiking far to a sport crag it would make sense, but for now I am not. I just want to find a basic stick clip head that I can attach to a painters extender pole and call it a day. One that I could use to remove a draw and clip the rope in are features that are important too of course. After searching it looks that if I were to buy one it would be the Trango unit the Squid. As I was highly considering pulling the trigger on mountaingear.com for 29.95 plus tax I decided to see about making my own.
I searched stick clip tricks and came across two homemade designs that appear to be legit. The taped carpenters clamp to the painters pole and the hanger that takes more time to build but seemed to be the right choice for me. I have used the clamp stick clip before and was not overly impressed. It definitely works but I want something that will last. I do not want to have to buy tape all of the time. I want something that is simple and does not require assembly every time. The hanger unit idea is from Tom's dirtbag climbing gear tricks, www.tom.grundy.tripod.com/basedir/camfix.html
I found the thickest hanger I could find and started to mold it. It was done in no time. I have two different sized draws so I have to alter the design that I found online, but in the end a perfect hanger stick clip was the result. I went to Lowe's and procured a paint roller, epoxy, a 10 ft painters extender pole( that was the lightest there), and a 3 ft long 1/8" brass wire.
I pulled the roller arm out of the paint roller and epoxied the hanger in its place. After the epoxy dried I was done. It was very easy. The pictures show tools and materials needed to complete this task. If you want one just let me know. I love the fact that I do not need to use tape to make this work too. Very solid.


I am interested in making the hanger wire thicker if I can find wire that will not break when I am tiring to fabricate. The brass brakes after two or three twists. I will use the hanger for now but plan to make a second out of thicker material.

I also have some ideas on making my second unit cheaper and lighter.

The cost now is far below that of all the other units I found. The Epic Sports is only $9.95 but you still have to buy tent pole extenders. That adds $25 very quick.
I will post a update after next weekend on how it works and any changes that should be made.
Wednesday, June 10, 2009

Gear Recommendation


Superfeet is an amazing product. Superfeet makes shoe inserts that can be trimmed to fit any shoe that takes an insert. There are many different inserts that Superfeet offers depending on what activities you are involved in and the type of arch you have. If you are a pronator or supinator, is a consideration for fitting too.
At first I was reluctant to use the insert because of the polycarbonate heal plate. I thought that it would be very stiff, rigid, and uncomfortable. I was right and wrong. The heal plate is rigid but not uncomfortable. The heel plate is designed at a certain pitch so it pushes your fatty pad under your calcaneus, aka heel, to add cushion. So it is comfortable. The fact that Superfeet uses polycarbonate instead of foam or gel for support is great. The polycarbonate does not loose its shape over time. This can be bad if you are loosing your arch due to a plethora of different medical problems or genes. If your loosing your arch a foam or gel insert will mold to the bad arch, not help stabilize it. The Superfeet will continue to support long after the foam and gel, in other inserts, have broken down.

I have a medium width foot and an average arch. I am a pronator. I use Superfeet in all of my shoes that permit an insert. I generally wear a size ten shoe, so I am an E in Superfeet sizing. I use a green insert in my everyday shoes and hikers, a blue in my Patagonia dress shoes, an orange in my running and approach shoes, a Redhot in my snowboard boots, and a yellow in my bike shoes. I have been wearing Superfeet for over two years now and have loved every minute of it.

Now saying all of this, I am not a podiatrist. I am not a orthopedist. I am just a man that beats up his feet on a regular basis. I am very active and I need to protect my feet for future use. I can not afford a custom made orthotic, which is the best insert on the market, because the money would come out of my trip fund. And I will not stand for that.
Wednesday, May 27, 2009

Learnig to repair shoes


So I am lame. I use a pair of road cycling shoes to commute to work in and I use them to single track in. I is the only pair I have. Last night I was headed to meet my wife at the hospital to help her study for her M&M presentation. On the way the Velcro ripped off of my Diadora's. I did not think anything of it at first but then when I tried to de-clip I was unsuccessful. I skirted a hard fall, just barely. I made it home OK. I sat down and had a beer. I thought that these shoes were cashed. I thought about how long I had them for and realized that I had owned them for almost six years. This was the first time that I had an issue with them, so I think that is a good run for $30 shoes. Right?


Wrong, I needed to get another six years out of them. I found my old sew kit. This took some searching. I started to sew and realized that the needle would slide through the Velcro with ease, but the poly outer layer would prove to not be so easy. I would ultimately use the top to a Camelbak bottle to push the needle through. This would stop the needle from continuing to puncture my finger. I have only sewn a few times, but I grew up watching my mother sew all the time. How hard could it be.
Sewing is not incredibly hard, but I think that there is a better technique to use that I am unaware of. I used the string that came in the packaging with the needle set, which did not list the tensile strength of it's contents. How frustrating.

I wond up with a bike shoe with all of it's original pieces connected in it's almost original fashion. I will test out my work to day on my commute. Stay tuned, maybe I will start a sewing business. Maybe I'll call it "Dirtbag Repair: Sewing, Straight from the Underground". Or maybe I will be buying a new pair of bike shoes, trail shoes this time.
Thursday, May 21, 2009


As soon as I saw that Black Diamond had updated their Livewire I new that the best way to test them was to get a set and take them to Sardinia. The new design in my opinion is great. I really like the new functional ergonomic features.
First off is the weight. The new draw has a total weight of 106g from 111g of it's predecessor. When you are carrying 12 of them, that weight difference is substantial. The 12-cm long Vari-width dogbone has been improved from 12cm dynex.
The new hot forged keylock Dynotron biner on top and Livewire on the bottom are very nice to handle. When you’re feeling the pump after to or three hard pitches it is nice to have a smooth keylock biner for easy removal from your harness. Both of the biner’s new design include a tapered edge to help avoid fumbling while in route. The lower biner, Livewire, has ridges added to the spine of the biner. This feature helps add friction while opening the gate to insert your rope. The gate on the Dynotron is tapered as well, for ease in opening. The Livewire still comes with a wire gate to help cut weight.
These draws compared to the previous sets of draws that I have used in the past are a better fit for my style of climbing. I give these draws a thumbs up to anyone that can afford the $24.95 price tag.